Posts

Showing posts from February, 2019

Birch Screen and Gardening Hutch

Image
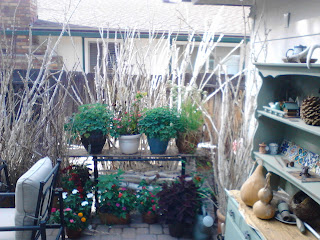
My view from the French doors off my kitchen. I picked up an old Hutch at a secondhand store and turned it into a storage spot for my gardening tools and other great outdoor items.

Birch Beauty

Image
                                                My beautiful Birch back yard screen oasis.

My Birch Inspiration

Image
I was able to rescue the beautiful Birch branches from the trees two of my friends had to cut down. I hauled load after load after load of branches in my Toyota Rav 4. I used the metal patio table that was not functional because the glass top had broken. A long shelf sits on the front end of the table top. The container flowers I plant in the Spring sit on that shelf. There is a layer of thick limbs stacked horizontally on either side of the tall more narrow branches. It is heavy and in no danger of being flipped over from the wind. I look out of my kitchen French doors to my beautiful Birch branch screen. One of my great joys in life. Creating something wondrous from something that comes my way. I just love it.

Dolls By The Seaside - Monterey Peninsula Feb. 15th to 17th

Image
Between the Idea and the Reality

Dolls By the Seaside

Image
This event is put on by the Independent Spirits Doll Club. Awesome location on the Monterey Peninsula. I am really looking forward to heading to one of my all time favorite places in the world. A little side trip into Carmel-ByThe-Sea is a must. Dates - Feb.15 to Feb. 17 Location - Embassy Suites Seaside - 1441 Canyon Del Rey, Seaside CA

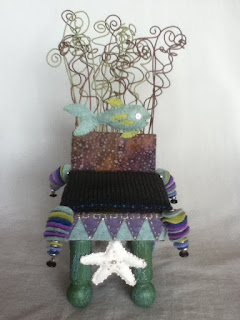
Garden Chair

Image
Here is another example of a digression from the original Fish chair. This chair has fine tree branches and some of the covered floral wire for the chair back. 

A Digression

Image
One of the great things about taking a class is the community of imagination that is assembled. More options beyond the original class project can be discussed. We will discuss the substitution of the floral wire for small tree branches. A very different kind of chair using natural materials can be an adaptation on the original concept. 

Pull up a fish and sit down

Image
The student will bring covered floral wire that will be coiled and twisted to give appearance of kelp. Wool felt and fish pattern will be supplied in the class. Fabric that will be needed for the class will be used for the back and seat of the chair. I have a weakness for Batiks. Fabric for the chair seat can be different than the chair back. We will explore options for the tassels at the edge of the chair pillow. Thick felt, or Warm and Natural will be placed inside the seat pillow. Chair seat will be hand sewn in class. 

Finished Sample doll for AFICC class

Image
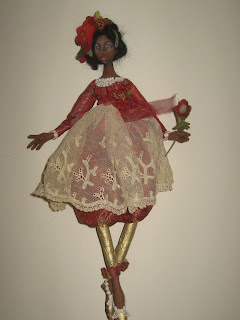
Here is an example of a finished doll for the AFICC conference in Columbus OH in April. Vintage textiles from India were used for the skirt. Metallic Momi paper was applied to the legs and shoes.

Doll Body for AFICC class Columbus OH

Image
The basic cloth doll body that is used for the AFICC doll class is a re imagining of a kind of Rag doll.  The legs will be slipped over the "Pegs". This enables us to have legs positioned and attached in a clean and efficient manner. 

Artistic Figures in Cloth and Clay Conference Columbus 2019

Image
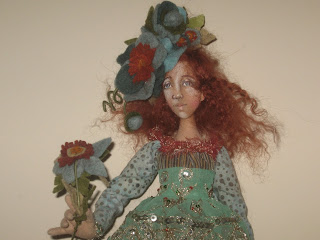
The creation of a wool felt flower fascinator hat for the class doll is a fun element of this class. 

Artistic Figures in Cloth and Clay Conference Columbus OH

Image
Students are free to use any vintage or special items in the costuming for the class in Columbus. Search the fabric stash for something special.

Artistic Figures in Cloth and Clay Conference 2019 Columbus OH

Image
For students taking this class in Columbus OH in April. Here is an example of a finished doll. This selection has a metallic Momi paper treatment on the legs. This is an optional choice. Students can bring lace and trim for the costuming if desired. The wool felt colors and floral wire is provided in class. 

Artistic Figures in Cloth and Clay Class - Columbus OH

Image
After the legs have been sewn, and the curved places are clipped, do not turn the leg. There is an opening at the top and at the toe. Spread the toe opening so that the seams touch. Pressing the seams open will help when you mark the curve from side of the foot and around the toes. Sew on the marked line. Clip any excess that is needed. Turn. Look carefully and the length of each foot. It is very common that one foot might be a bit longer. Re-turn and make the sewing adjustment to get the foot to be equal to the other foot. When the legs are turned, stuff the foot, ankle and halfway up the leg. Go no further than stuffing the leg halfway up.
Image
La Demoiselle class for Artistic Figures in Cloth and Clay - April 2019 Columbus OH The student will sew some items in advance. TORSO       The torso has a waist, shoulders and a long tab that the head will sit on. There are two short “pegs” that extend below the hips. I know it looks strange. The legs are slipped over these “pegs”. So the “pegs” are just a mechanism for that to happen.       Leaving the opening in one of the pegs is the opening that will be used when turning the torso after the curved parts are clipped. After the torso is turned, sew a line where indicated. Sew a line from one side of the hip to the next. We will open a seam in the side to stuff the upper body. We can do that in class.